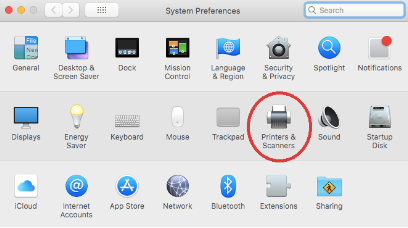
Step 1 - Open System Preferences
Open System Settings (or System Preferences on older versions).
By default, you can access this from your toolbar by
clicking this icon:

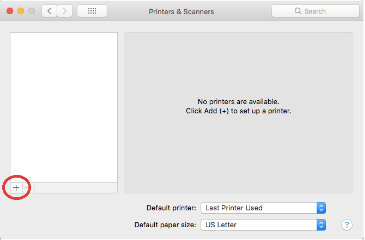
Step 2 - Printers and Scanners
Open the Printer and Scanners menu
Step 3 - Add Printer
Click the + button in the lower left corner of the window.
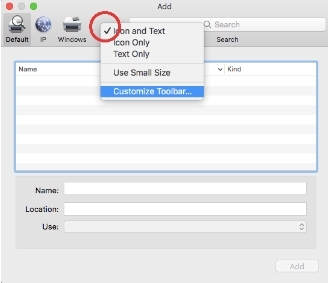
Step 4 - Customize Toolbar
The Find Me queue needs to be added using the advanced menu.
This menu is hidden by default, and we need to add it to the toolbar before we can use it.
To do this, start by holding the control button while clicking on the ‘add’ window toolbar.
This should open a small menu with a “Customize Toolbar” option.
Select this option.
From there, you should be able to drag the “advanced’ icon onto the toolbar.
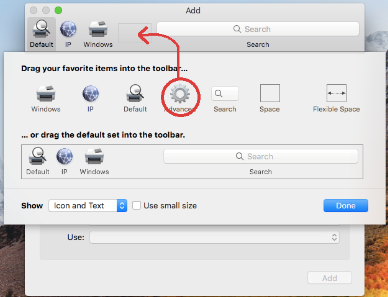
When the icon has been added to the toolbar, you can select “done” to close the Customize Toolbar window.
You should now be able to click the “advanced” icon to open the advanced printer menu.
Step 5 - Change Advanced Settings
In the Advanced window, you will need to make the following changes:
- Type needs to be changed to
Windows printer via spoolss
- URL needs to be changed to
smb://printserve.viu.ca/findme
- Name should be changed to
Find Me
- Use should be changed to
Generic PostScript Printer
When you’re finished, it should look like the image below:

Press Add to add the new printer queue to your Mac!
Please note that when you try to print, you will be asked to provide credentials.
You should enter your full VIU credentials including the VIU\ before your username.
For example:
Employees: A user with the username 'smithj' should enter viu\smithj
Students: A user with student number '123456789' should enter viu\123456789